Barma Sektor: Unterschied zwischen den Versionen
Aus Holopedia
Zur Navigation springenZur Suche springenFlames (Diskussion | Beiträge) |
|||
| (4 dazwischenliegende Versionen desselben Benutzers werden nicht angezeigt) | |||
| Zeile 1: | Zeile 1: | ||
| + | [[Kategorie:Sektoren]] | ||
| + | [[Kategorie:Old Colonies Cluster]] | ||
| + | [[Kategorie:Barma Sektor]] | ||
<div id="contentSub"><span class="subpages">< [[Die Galaxie|Die Galaxie]] < [[Old_ Colonies Cluster|Old Colonies Cluster]] < {{#if:{{{1|}}}|{{#ifexist:Portal:{{{1}}}|[[Portal:{{{1}}}|{{{1}}}]]|{{{1}}}}} < {{#if:{{{2|}}}|{{#ifexist:Portal:{{{2}}}|[[Portal:{{{2}}}|{{{2}}}]]|{{{2}}}}} < {{#if:{{{3|}}}|{{#ifexist:Portal:{{{3}}}|[[Portal:{{{3}}}|{{{3}}}]]|{{{3}}}}} < {{#if:{{{4|}}}|{{#ifexist:Portal:{{{4}}}|[[Portal:{{{4}}}|{{{4}}}]]|{{{4}}}}} < '''{{PAGENAME}}'''|'''{{PAGENAME}}'''}}|'''{{PAGENAME}}'''}}|'''{{PAGENAME}}'''}}|'''{{PAGENAME}}'''}} </span></div> | <div id="contentSub"><span class="subpages">< [[Die Galaxie|Die Galaxie]] < [[Old_ Colonies Cluster|Old Colonies Cluster]] < {{#if:{{{1|}}}|{{#ifexist:Portal:{{{1}}}|[[Portal:{{{1}}}|{{{1}}}]]|{{{1}}}}} < {{#if:{{{2|}}}|{{#ifexist:Portal:{{{2}}}|[[Portal:{{{2}}}|{{{2}}}]]|{{{2}}}}} < {{#if:{{{3|}}}|{{#ifexist:Portal:{{{3}}}|[[Portal:{{{3}}}|{{{3}}}]]|{{{3}}}}} < {{#if:{{{4|}}}|{{#ifexist:Portal:{{{4}}}|[[Portal:{{{4}}}|{{{4}}}]]|{{{4}}}}} < '''{{PAGENAME}}'''|'''{{PAGENAME}}'''}}|'''{{PAGENAME}}'''}}|'''{{PAGENAME}}'''}}|'''{{PAGENAME}}'''}} </span></div> | ||
| − | + | ||
{| width="46%" align="center" border="0" cellpadding="0" cellspacing="1" style="border: 2px solid gray; border-collapse: collapse;" padding-left:0.5em; padding-right:0.5em; background: #f2f2f2;" | {| width="46%" align="center" border="0" cellpadding="0" cellspacing="1" style="border: 2px solid gray; border-collapse: collapse;" padding-left:0.5em; padding-right:0.5em; background: #f2f2f2;" | ||
|- | |- | ||
| Zeile 8: | Zeile 11: | ||
<imagemap> | <imagemap> | ||
Image:Barmersektor.jpg|800px|alt=Taktische Karte|center | Image:Barmersektor.jpg|800px|alt=Taktische Karte|center | ||
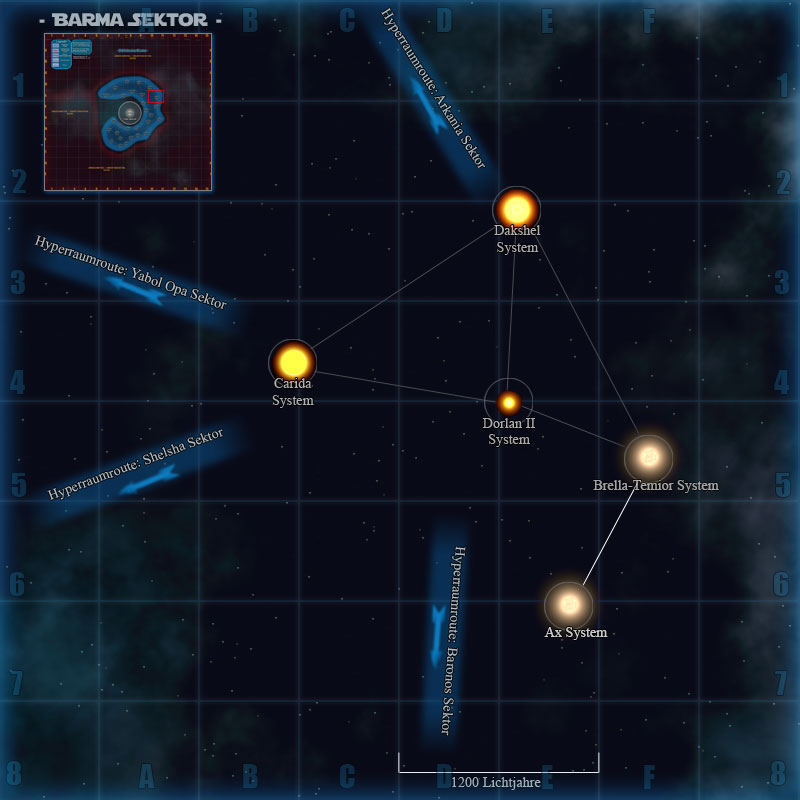
| − | circle 650 457 22 [[ | + | circle 650 457 22 [[Brella-Temior System|Brella-Temior System]] |
circle 292 366 22 [[Carida System|Carida System]] | circle 292 366 22 [[Carida System|Carida System]] | ||
| − | circle 518 209 22 [[ | + | circle 518 209 22 [[Dakshee System|Dakshee System]] |
circle 509 402 22 [[Dorlan II System|Dorlan II System]] | circle 509 402 22 [[Dorlan II System|Dorlan II System]] | ||
| + | circle 509 402 22 [[AX System|AX System]] | ||
poly 41 31 207 33 210 189 44 190 [[Old Colonies Cluster|Old Colonies Cluster]] | poly 41 31 207 33 210 189 44 190 [[Old Colonies Cluster|Old Colonies Cluster]] | ||
poly 390 0 503 170 468 191 360 19 [[Arkania Sektor|Arkania Sektor]] | poly 390 0 503 170 468 191 360 19 [[Arkania Sektor|Arkania Sektor]] | ||
poly 36 227 242 300 234 332 29 259 [[Yabol Opa Sektor|Yabol Opa Sektor]] | poly 36 227 242 300 234 332 29 259 [[Yabol Opa Sektor|Yabol Opa Sektor]] | ||
poly 31 490 224 418 246 453 41 529 [[Shelsha Sektor|Shelsha Sektor]] | poly 31 490 224 418 246 453 41 529 [[Shelsha Sektor|Shelsha Sektor]] | ||
| − | poly 429 524 477 525 458 741 410 741 [[ | + | poly 429 524 477 525 458 741 410 741 [[Baronas Sektor|Baronas Sektor]] |
</imagemap> | </imagemap> | ||
| Zeile 30: | Zeile 34: | ||
!bgcolor="#F1F1F1" width="15%" |<center>Lage: ''[[Old Colonies Cluster]]''</center> | !bgcolor="#F1F1F1" width="15%" |<center>Lage: ''[[Old Colonies Cluster]]''</center> | ||
|- | |- | ||
| − | !bgcolor="#F1F1F1" width="15%" |<center>Systeme: '' | + | !bgcolor="#F1F1F1" width="15%" |<center>Systeme: ''5''</center> |
| − | !bgcolor="#F1F1F1" width="15%" |<center>Einflussbereich: '' | + | !bgcolor="#F1F1F1" width="15%" |<center>Einflussbereich: ''2900 Parsec''</center> |
|} | |} | ||
{|align="right" border="6" cellpadding="6" cellspacing="1" style="border: 2px solid gray; border-collapse: collapse;" width="49%" | {|align="right" border="6" cellpadding="6" cellspacing="1" style="border: 2px solid gray; border-collapse: collapse;" width="49%" | ||
!bgcolor="#F1F1F1" width="10%" |<center> Info</center> | !bgcolor="#F1F1F1" width="10%" |<center> Info</center> | ||
| − | !bgcolor="#F1F1F1" width="20%" |<center>[[Bild: | + | !bgcolor="#F1F1F1" width="20%" |<center>[[Bild:Brella-Temiorkl.png]]</center> |
| − | !bgcolor="#F1F1F1" width="50%" |<center> [[ | + | !bgcolor="#F1F1F1" width="50%" |<center> [[Brella-Temior System]]</center> |
|- | |- | ||
!bgcolor="#F1F1F1" width="10%" |<center> Info</center> | !bgcolor="#F1F1F1" width="10%" |<center> Info</center> | ||
| − | !bgcolor="#F1F1F1" width="20%" |<center>[[Bild: | + | !bgcolor="#F1F1F1" width="20%" |<center>[[Bild:Cardiakl.png]]</center> |
!bgcolor="#F1F1F1" width="50%" |<center> [[Carida System]]</center> | !bgcolor="#F1F1F1" width="50%" |<center> [[Carida System]]</center> | ||
|- | |- | ||
!bgcolor="#F1F1F1" width="10%" |<center> Info</center> | !bgcolor="#F1F1F1" width="10%" |<center> Info</center> | ||
| − | !bgcolor="#F1F1F1" width="20%" |<center>[[Bild: | + | !bgcolor="#F1F1F1" width="20%" |<center>[[Bild:Daksheekl.png]]</center> |
| − | !bgcolor="#F1F1F1" width="50%" |<center> [[ | + | !bgcolor="#F1F1F1" width="50%" |<center> [[Dakshee System]]</center> |
|- | |- | ||
!bgcolor="#F1F1F1" width="10%" |<center> Info</center> | !bgcolor="#F1F1F1" width="10%" |<center> Info</center> | ||
!bgcolor="#F1F1F1" width="20%" |<center>[[Bild:DorlanIIkl.png]]</center> | !bgcolor="#F1F1F1" width="20%" |<center>[[Bild:DorlanIIkl.png]]</center> | ||
!bgcolor="#F1F1F1" width="50%" |<center> [[Dorlan II System]]</center> | !bgcolor="#F1F1F1" width="50%" |<center> [[Dorlan II System]]</center> | ||
| + | |- | ||
| + | !bgcolor="#F1F1F1" width="10%" |<center> Info</center> | ||
| + | !bgcolor="#F1F1F1" width="20%" |<center>[[Bild:Ax2kl.png]]</center> | ||
| + | !bgcolor="#F1F1F1" width="50%" |<center> [[Ax System]]</center> | ||
|- | |- | ||
|}<br><br><br><br> | |}<br><br><br><br> | ||
| Zeile 56: | Zeile 64: | ||
{|align="left" border="6" cellpadding="6" cellspacing="1" style="border: 2px solid gray; border-collapse: collapse;" width="50%" | {|align="left" border="6" cellpadding="6" cellspacing="1" style="border: 2px solid gray; border-collapse: collapse;" width="50%" | ||
!bgcolor="#F1F1F1" width="15%" | | !bgcolor="#F1F1F1" width="15%" | | ||
| − | <div align="left">./.</div> | + | <div align="left">./. |
| + | |||
| + | ==Quelle== | ||
| + | |||
| + | *Wookiepedia | ||
| + | *The Essential Atlas | ||
| + | *StarWars.com | ||
| + | *Star Wars Empire | ||
| + | </div> | ||
|} | |} | ||
Aktuelle Version vom 31. Dezember 2020, 11:51 Uhr
< Die Galaxie < Old Colonies Cluster < Barma Sektor
| Taktische Karte des Barma Sektors ( Die Systeme auf der Grafik können angeklickt werden ) | |||||||||||||||||||||||
| |||||||||||||||||||||||
