Meram Sektor: Unterschied zwischen den Versionen
Aus Holopedia
Zur Navigation springenZur Suche springen| Zeile 1: | Zeile 1: | ||
<div id="contentSub"><span class="subpages">< [[Die Galaxie|Die Galaxie]] < [[Outer_Rim_Cluster|Outer Rim Cluster]] < {{#if:{{{1|}}}|{{#ifexist:Portal:{{{1}}}|[[Portal:{{{1}}}|{{{1}}}]]|{{{1}}}}} < {{#if:{{{2|}}}|{{#ifexist:Portal:{{{2}}}|[[Portal:{{{2}}}|{{{2}}}]]|{{{2}}}}} < {{#if:{{{3|}}}|{{#ifexist:Portal:{{{3}}}|[[Portal:{{{3}}}|{{{3}}}]]|{{{3}}}}} < {{#if:{{{4|}}}|{{#ifexist:Portal:{{{4}}}|[[Portal:{{{4}}}|{{{4}}}]]|{{{4}}}}} < '''{{PAGENAME}}'''|'''{{PAGENAME}}'''}}|'''{{PAGENAME}}'''}}|'''{{PAGENAME}}'''}}|'''{{PAGENAME}}'''}} </span></div> | <div id="contentSub"><span class="subpages">< [[Die Galaxie|Die Galaxie]] < [[Outer_Rim_Cluster|Outer Rim Cluster]] < {{#if:{{{1|}}}|{{#ifexist:Portal:{{{1}}}|[[Portal:{{{1}}}|{{{1}}}]]|{{{1}}}}} < {{#if:{{{2|}}}|{{#ifexist:Portal:{{{2}}}|[[Portal:{{{2}}}|{{{2}}}]]|{{{2}}}}} < {{#if:{{{3|}}}|{{#ifexist:Portal:{{{3}}}|[[Portal:{{{3}}}|{{{3}}}]]|{{{3}}}}} < {{#if:{{{4|}}}|{{#ifexist:Portal:{{{4}}}|[[Portal:{{{4}}}|{{{4}}}]]|{{{4}}}}} < '''{{PAGENAME}}'''|'''{{PAGENAME}}'''}}|'''{{PAGENAME}}'''}}|'''{{PAGENAME}}'''}}|'''{{PAGENAME}}'''}} </span></div> | ||
[[Kategorie:Sektoren]] | [[Kategorie:Sektoren]] | ||
| − | {| width=" | + | {| width="46%" align="center" border="0" cellpadding="0" cellspacing="1" style="border: 2px solid gray; border-collapse: collapse;" padding-left:0.5em; padding-right:0.5em; background: #f2f2f2;" |
|- | |- | ||
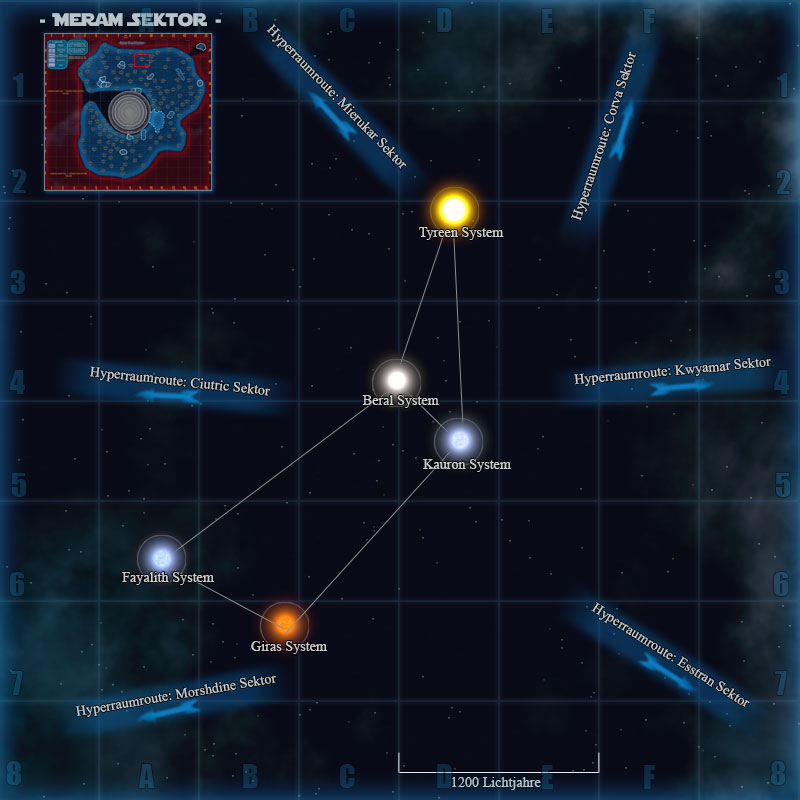
| − | | width="80%" align="center" border="6" cellspacing="1" style="border: 2px solid gray; border-collapse: collapse; background: #202030; padding-left:0.5em; padding-right:0.5em; padding-top:0.3em; padding-bottom:0.1em;" | <font color="#ffffff"><b>Taktische Karte des Meram | + | | width="80%" align="center" border="6" cellspacing="1" style="border: 2px solid gray; border-collapse: collapse; background: #202030; padding-left:0.5em; padding-right:0.5em; padding-top:0.3em; padding-bottom:0.1em;" | <font color="#ffffff"><b>Taktische Karte des Meram Sektors<br><small>( Die Systeme auf der Grafik können angeklickt werden )</small></b></font> |
|- | |- | ||
| + | | width="80%" align="left" background: white; padding-left:0.5em; padding-right:0.5em; padding-top:0.3em; padding-bottom:0.1em;" | | ||
| + | <imagemap> | ||
| + | Image:Meram-Sektor.jpg|800px|alt=Taktische Karte|center | ||
| + | circle 455 209 26 [[Tyreen System]] | ||
| + | circle 397 385 32 [[Beral System]] | ||
| + | circle 681 90 26 [[Gamorr System]] | ||
| + | circle 160 560 31 [[Fayalith System]] | ||
| + | circle 294 628 32 [[Giras System]] | ||
| + | circle 460 439 32 [[Kauron System]] | ||
| + | poly 84 361 281 380 275 413 73 391[[Ciutric Sektor]] | ||
| + | poly 69 706 274 665 283 699 75 738 [[Morshdine Sektor]] | ||
| + | poly 272 14 419 166 395 188 251 40 [[Mierukar Sektor]] | ||
| + | poly 630 20 661 26 604 218 564 223 [[Corva Sektor]] | ||
| + | poly 566 373 776 354 776 388 565 405[[Kwyamar Sektor]] | ||
| + | poly 586 591 785 697 745 730 568 618 [[Esstran Sektor]] | ||
| + | rect 43 34 212 190 [[Outer Rim Cluster]] | ||
| + | </imagemap> | ||
{| width="100%" align="center" cellpadding="0" cellspacing="0" style="border:0px; padding-left:0.5em; padding-right:0.5em; background: #f2f2f2; padding-top:0.3em; padding-bottom:0.1em;" | {| width="100%" align="center" cellpadding="0" cellspacing="0" style="border:0px; padding-left:0.5em; padding-right:0.5em; background: #f2f2f2; padding-top:0.3em; padding-bottom:0.1em;" | ||
{|align="left" border="6" cellpadding="6" cellspacing="1" style="border: 2px solid gray; border-collapse: collapse;" width="50%" | {|align="left" border="6" cellpadding="6" cellspacing="1" style="border: 2px solid gray; border-collapse: collapse;" width="50%" | ||
| Zeile 26: | Zeile 43: | ||
|- | |- | ||
!bgcolor="#F1F1F1" width="10%" |<center> Info</center> | !bgcolor="#F1F1F1" width="10%" |<center> Info</center> | ||
| − | !bgcolor="#F1F1F1" width="20%" |<center></center> | + | !bgcolor="#F1F1F1" width="20%" |<center>[[Bild:Tyreenkl.png]]</center> |
!bgcolor="#F1F1F1" width="50%" |<center>[[Tyreen System]]</center> | !bgcolor="#F1F1F1" width="50%" |<center>[[Tyreen System]]</center> | ||
|- | |- | ||
Version vom 20. November 2017, 16:59 Uhr
< Die Galaxie < Outer Rim Cluster < Meram Sektor
| Taktische Karte des Meram Sektors ( Die Systeme auf der Grafik können angeklickt werden ) | |||||||||||||||||||||||
| |||||||||||||||||||||||
